Tuesday, October 4, 2011

Payment Gateway FAQ

Payment Gateway is is software provided by a company that allows merchants to sell securely from their Web sites, enabling customers to purchase products or services online with their choice of credit card, debit card or electronic check.

Why are payment gateways used ?
Merchants cannot be limited to 'cash on delivery' methods. As the internet draws customers from all parts of the world, a system which enables credit card payments makes it possible for a website to cater to international clients. Not only this, the payment processing and collection is all electronic freeing up important resources for other tasks.

How do payment gateways work ?
Payment Processing services provide a secure web interface for buyers to enter their credit card details online. Once the buyer enters all the details, the numbers are checked for discrepancies to prevent fraudulent misuse by credit card processing server. Bank databases are queried to approve the transaction. Upon approval, the merchant gets the money debited to his bank account.

What do I need to enable credit card processing on my site?


Below are the basic elements needed for accepting online orders via credit card:

  1. A Merchant account
  2. A SSL Certificate for the web site domain
  3. Real-time credit card processing software (on your web server)
  4. Online transaction processing company
  5. Payment Gateway Software (on your processing company's server)
  6. The software in #3 and #4 above must be connected and integrated.

What is a credit card merchant account?
A credit card merchant account allows the merchant to accept credit cards for payment of goods and services. A customer provides his or her credit card number while pruchasing the goods or service. The data is submitted to merchant's merchant account provider (typically a bank). Within a few days the funds are electronically deposited into merchant business bank account.

How do I obtain a credit card merchant account?
Most banks offer merchant account services. Check with your current bank and ask for an application regarding the same. You can also find companies that specialize in providing merchant account services in addition to the lease and sale of credit card terminals, processing software, etc. You can search the web for a list of such companies.

What is a SSL (Secure Server Layer) Certificate?
An SSL certificate makes sure that the data traveling between your computer and the merchants web site is secure and can not eavesdropped by a third party. It also makes sure that the site your are viewing is indeed owner of the web site domain name. While shopping online, you go to a webpage where it asks for your credit card information, you should see a little padlock symbol at the bottom of your web browser window. Only websites that have a SSL Certificate have this padlock on them. This indicates that information entered on this webpage is secure. By secure, we mean encrypted (encoded) so that no one may intercept this data except the intended persons. You should never buy anything from a site which DOES NOT have SSL security.

What is 'Real-time' credit card processing?
Real-time credit card processing allows your web order pages to immediately submit your customer's credit card information via the Internet to your merchant account bank for authorization. Real-time authorization is useful if you anticipate a large volume of online transactions or wish to provide your customer with immediate access to your product or service.


How do I collect orders on my web site?
The most common methods are using a simple online order form, or a shopping cart system with an order form. Once your customer completes your online order form the order can be delivered to you via email, saved to a text file or saved to a database file on your web site for you to retrieve. Upon receipt of your customer's order you can submit their credit card and payment information to your merchant account provider and deliver your product or service.

When should I use a simple stand alone online order form?
If you have a small number of items available to purchase (less than one or two dozen unique products or services).

If are looking for an inexpensive solution or have a limited Internet budget If you are a novice or immediate web designer and want to start with a simple, easy to build order system.

When should I use a shopping cart system on my web site?

If you have a larger number of items available for sale (more than a dozen)
If you wish to automatically total a customer's order including shipping, tax

Link your application to the most known payment gateways
All modern e-commerce web applications allow instant credit card payment processing by linking the checkout process to a payment gateway. MX Kart takes care of this issue by offering instant support for some of the most important payment gateways around, including:
PayPal – http://www.paypal.com/

Authorize.net - http://www.authorizenet.com/

2checkout - http://www.2checkout.com/

Verisign Payflow Link - http://www.verisign.com/

Worldpay – http://www.worldpay.com/

SecPay - http://www.secpay.com/

Possibility for offline payment

You have to customize your checkout wizard a little bit one time, and MX Kart generated code will do the rest for you:

create an order in the database
communicate securely with the payment gateway
receive the payment notification to confirm the order.
You don't have to worry about security or about error handling – MX Kart will take care of everything for you.
Monday, March 7, 2011

Integrate OIM 11g with OID using connector for Provisioning / Reconcilliation - Installation

Posted in February 16th, 2011

This post covers installation of Oracle Identity Manager (OIM) connector to provision or reconcile users to/from Oracle Internet Directory (OID). There is another way to integrate OIM 11g with OID 11g using Oracle Virtual Directory (OVD) which is LDAP Sync .

This post is for OIM-OID integration using pre-built connector and assumes that

  • Oracle Internet Directory is already installed, for OID 11g installation click here.
  • Oracle Identity Manager is already installed, for OIM 11g installation click here

.

OIM Connector for OID Key Points

  • Current OIM connector version for OID is 9.0.4.14
  • You can use OIM-OID connector version 9.0.4.12 to integrate OIM 9.X/11g with OID 10g/11g
  • This post uses OID superuser “cn=orcladmin” to connect from OIM to OID (It is recommended to create user in OID, dedicated to be used by OIM-OID connector)

.

OIM-OID connector installation/configuration

1. Download OIM-OID connector from here

2. Download LDAP-1_2_4.zip from here (Click on “Download JNDI 1.2.1” and then click on ldap-1_2_4.zip) extract LDAP-1_2_4.zip and copy ldap.jar, ldapbp.jar (this is under lib directory) and copy it to $ORACLE_HOME/server/ThirdParty (on OIM Server)

3. Install OIM-OID connector
3.1 Copy OIM/OID connector software (OID_904120.zip) to $ORACLE_HOME/ server/ ConnectorDefaultDirectory (on OIM Server)

3.2
Unzip OID_904120.zip

3.3
Login to OIM Administrator URL (http://server:14000/oim - xelsysadm / xelsysadm_password)

3.4
Click on Advanced tab (This is OIM Advanced Administration Console)
.

.
3.5 Click on Install Connector under System Management
.

.
3.6 From Connector List drop down select “Oracle Internet Directory 9.0.4.12” and click Load and then click on Continue
.

.
3.8 On successful connector installation, message indicating successful installation is displayed. In my case installation failed at compilation

DOBJ.EVT_INTERNAL_ERROR Adapter Compilation Failure Bulk Exception
.

.
.
Check logs in $MW_HOME/ user_projects/ domain/ base_domain/ servers/ oim_server1/ logs

____________

internal error. : /tmp/oracle/oim/adapters/adpOIDCREATEUSER.java (Too many open files)>

/tmp/oracle/oim/adapters/adpOIDADDUSERTOROLE.java (Too many open files)
java.io.FileNotFoundException: /tmp/oracle/oim/adapters/adpOIDADDUSERTOROLE.java (Too many open files)
at java.io.FileOutputStream.open(Native Method)
at java.io.FileOutputStream.(FileOutputStream.java:179)
at java.io.FileOutputStream.(FileOutputStream.java:131)
___________

Fix : Increase number of open file by updating /etc/security/limits.conf

.

3.9 Run Oracle Identity Manager PurgeCache utility to load the server cache with content from the connector resource bundle in order to view the list of prerequisites

set WL_HOME
ORACLE_HOME/server/bin/purgeCache.sh All

When prompted for
[Enter the admin username:] entter xelsysadm
[Enter the admin username:] entter xelsysadm
[Enter the service URL:] t3://server:14000

Note: Ensure that WebLogic Full Client jar file is created under $WL_HOME/server/lib/wlfullclient.jar , check here

3.10 Configure IT resource

3.10.1Login to OIM Administrator URL (http://server:14000/oim - xelsysadm/xelsysadm_password) and click on Advanced tab on top right menu bar

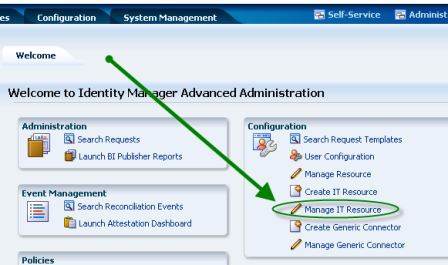
3.10.2 Click on “Manage IT Resource” under Configuration
.

.

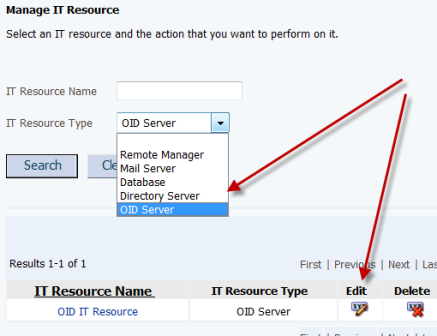
3.10.3 In the IT Resource Type field on the Manage IT Resource page, select OID Server and then click Search. Click the edit icon for the IT resource.


.
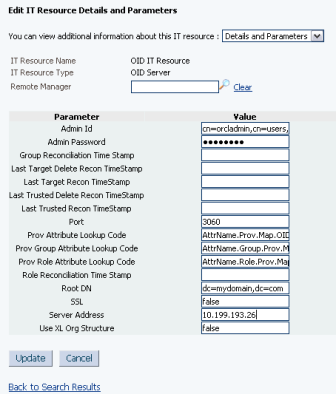
3.10.4 Specify values for the parameters of the IT resource.

Admin ID: DN value of the user who has administrator rights on the Oracle Internet Directory server (cn=orcladmin,cn=users,dc=mydomain,dc=com)
Admin Password : Password of user mentioned in Admin ID
Root DN: OID Domain (also called Realm)
Port : OID Port (default port for OID 11g is 3060 and for OID 10G 389 )
Server: OID Server
.

.
4. Perform first time reconciliation
First-time or full reconciliation involves reconciling all existing user records from the target system (OID) into Oracle Identity Manager (OIM)

4.1Perform lookup field synchronization (Run following tasks - Organization Lookup Reconciliation, Role Lookup Reconciliation, Group Lookup Reconciliation)

4.1.1From OIM Administration console, click on “Advanced” under “System Management” click on “Search Scduled Jobs” and search for “OID Organization Lookup Reconciliation”, Click on “Run Now

Repeat this for “OID Role Lookup Reconciliation” & “OID Group Lookup Reconciliation”

4.2 Perform user reconciliation

4.2.1From OIM Administration console, click on “Advanced” under “System Management” click on “Search Scheduled Jobs” and search for “OID User Target Recon Task“, click on “Run Now”

If you get error like
______
Exception java.lang.NoClassDefFoundError: com/sun/jndi/ldap
Message /ctl/PagedResultsControl
_______

Enure that you have ldapbp.jar & ldap.jaris in $ORACLE_HOME/server/ThirdParty

5. Test Provisioning Operation using link here

.

References

Sunday, March 6, 2011

SSO with SAML & ADF Security

Posted by Edwin Biemond

In my previous blog I got Single Sign On working with J2EE container security. In this blog entry I got it also working with ADF Security. Just create a SAML source and destination site and follow these steps
Create a new relying party for the ADF Security Application on the SAML source site.

Go the WLS console of the Saml source server and go to the myrealm Security Realm
Go to providers -> Credential Mapping -> SAMLCredentialMapper
SAMLCredentialMapper -> Managment -> new Relying Party

Partner ID: rp_00004
Profile: Browser/POST
Target URL: http://localhost:7101/appC/adfAuthentication the url of ADF security servlet on the destination site
Assertion Consumer URL: https://localhost:7102/samlacs/acs
Assertion Consumer Parameters: APID=ap_00002

Saml Destination server , this is the WebLogic Server of the ADF Security Application
Go the myrealm Security Realm -> Providers -> Authentication and select the SAML Identity Assertion provider -> Management -> Asserting Party

Partner ID: ap_00002
Profile: Browser/POST
Target URL: http://localhost:7001/appA This is the main application on the SAML source site

Source Site Redirect URIs: /appC/adfAuthentication The url of ADF Security Servlet
Source Site ITS URL: https://localhost:7002/samlits_ba/its
Source Site ITS Parameters: RPID=rp_00004

On the main site you can add a link to the ADF Security application like this appC

And change login-conf in the web.xml of the ADF Security Application so it uses certificate auhtentication.

CLIENT-CERT
myrealm


The only thing that isn't working yet is the redirecting to the success url after the succesfull authentication by the ADF Security servlet.

SSO with WebLogic 10.3 and SAML

Edwin Biemond

With Weblogic it is relative easy to setup Single Sign On between Servers who has support for SAML. In this blog I will show you, how you can setup SSO between two ADF applications on different WebLogic servers. Off course you can also use Remote Task Flows for this, but when you setup SAML you can use this to protect your web services or use it for identity propagation with OWSM in combination with ESB, BPEL or OSB.
This blog is based on the article of Vikrant Sawant where he did the same with two WLS 9.2 Domains.I will use this blog as the starting point for my next blog entries, I am thinking about the following blog entries, How to use SSO / SAML with ADF Security , SAML with OWSM / OSB / ESB and BPEL. In this blog entry I will use the standard container security.

To make this work we need to have two WLS domains. I created a new domain with the configuration wizard of JDeveloper 11G and enabled the ADF option on this domain. I use the internal Weblogic domain of JDeveloper as the secondary domain.
The new domain will be the SAML Source site but first we need to configure the WebLogic server instance by enabling SSL. SAML will need SSL for the secured communication between the SAML source and destinations domains. For this source domain I will use port 7001 and 7002 (SSL)
Define the keystores, I have my own keystores but you can also use the WLS demo keystores


If you use your own keystore then you propably have to set the new private key alias.
Add a SAML 1.1 source site at the Federation Services tab.

The second step on the SAML Source site is to configure the myrealm security domain. In this step we start by adding a Credential Mapping.

In the provider Specific Tab of the just created credential mapping we have to define the details.


Now we can add the first SAML client (Relying Party ) of this source site. This will be the application which runs on the internal weblogic domain of JDeveloper. The first entry is called rp_00001
Add the url of secured page ( the url of the second application ) and the https port of the SAML destination url. Here we also have to provide the assertion id of the client SAML. This is APID=ap_00001. We will create this later (asserting party ) on the destination SAML domain.

For the communication we need to import the public keys. In my case is this the ca and the server public key. Just export these key from the keystores and rename these keys to the der file extension.


Step 3 is to setup the SAML destination site. I will use the internal Weblogic domain of JDeveloper for this. Default JDeveloper uses port 7101 and in this domain we also need to enable the SSL port ( port 7102 ).
Next go to the Federation Services of the server instance and enable SAML 1.1 destination Site.

Go to the myrealm security domain and add a new SAML authentication.

Add a new asserting party.

Here we add the url of the application which run on the source site. And the id of the relying party on the source site.

Here we also have to import the public keys of ca and server.

The last WebLogic step is to add a common authorization provider on both domains. I use a LDAP or a SQL authenticator for this. Both WLS domains need to have the same users and groups.

We are finished with the WebLogic configuration. Now we can make two ADF applications. For these application I will use the faces-config.xml and not the unbounded task flow. And I use the standard container security and not ADF Security.

the web.xml of the source application looks like this.
  1. aut
  2. /faces/aut/*
  3. valid-users
  4. BASIC
  5. myrealm
  6. valid-users


the weblogic.xml of the source and destination application ( to map the valid-user role to the wls user group ).
  1. version = '1.0' encoding = 'windows-1252'?>
  2. xmlns:xsi="http://www.w3.org/2001/XMLSchema-instance" xsi:schemaLocation="http://www.bea.com/ns/weblogic/weblogic-web-app.xsd" xmlns="http://www.bea.com/ns/weblogic/weblogic-web-app">
  3. valid-users
  4. users


the web.xml of the destination application, now we have to use CLIENT-CERT.
  1. aut
  2. /faces/aut/*
  3. valid-users
  4. CLIENT-CERT
  5. myrealm
  6. valid-users

When the user logs in on the destination site then it will automatically redirected to the source site .
That's all for now.